Sunday, February 19, 2012

"A SPACE ADVENTURE THAT NEVER WAS" Part Two


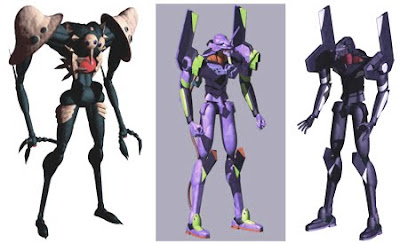
By 1998 my projects revolved around my anticipation for the forthcoming Star Wars Episode I and the anime masterpiece Evangelion. Below is my design for something I called the 'T.I.E. Strife'. I had absolutely no idea that Lucas wouldn't start the Star Wars prequels so far in the Original Trilogy's past. So I imagined primitive TIE Fighters, assuming that Episode I would be set in a time closer to A New Hope.


If you click images to magnify them, you can see the difference importing Texture Maps makes. Personally, I think the vehicle below looks much more convincing. Bare in mind, these things are made with KPT Bryce 1.0 from 1994.


My favorite 'Angel' from the Evangelion series. This one is called Sachiel.


If you read part 1 of this post, you'll realize that only a crazed maniac has the patience to construct intricate CGI models (with FINGERS) out of limited geometric primitives. Parts could be grouped together to separate the arms from the body, divide the torso into segments, articulate the mouth, etc... to make the figures posable and articulated. All on an $80 program! Crazy!


Thursday, February 9, 2012

"A SPACE ADVENTURE THAT NEVER WAS" Part One


Long ago, 1995 I think, I acquired an inexpensive but very satisfying computer graphics program called KPT Bryce. It was created by Kai's Power Tools back when they were still joined with an old software company called Metacreations. It was then in those years that my brief experimentation with CGI began and then quickly ended in part for personal reasons, because I went back to hand-painted art, and because of the ever-shifting and impermanent world of computer software and hardware technologies.


I was running this software on my first Mac, the Apple 6320cd, a cream colored machine that operated on 16 MB OF RAM! AND HAD A HARD DRIVE OF 1.2 GB! I don't think I have a flash drive with less than 2Gb on it. Well, the program was made for rendering landscapes of canyons and islands but also had a few basic geometric primitives like cubes and spheres or even a pyramid shape to drop in your cg desert. One of my earliest creations, that horrifies me now, is a DUNE themed landscape. This was made quickly with the program's fractal-based land mass generator and the adjustable "atmosphere" controls to make clouds, mist, haze, etc...


So I continued "playing" with Bryce's geometric primitives, which could be elongated, connected, colored and textured. Above is an example of these in an unfinished Gundam mecha I was designing. It's right leg and arm pieces were assembled separately and the picture probably shows nearly a hundred of these small geometric bits. By current CGI model making standards, it's really time consuming and complex, even if the result looks simple.


Because I'm a huge Star Wars mega-nerd, I went on to make figures from that series. Tho not terribly realistic (they look really funny to me now), I would use these as smaller elements in very complex scenes with buildings, spacecraft, and moons thrown into their synthetic skies. The more familiar creature at the left, a Rodian, had his head first constructed from a larger sphere, his snout from a cylinder attached to the sphere, and then everything else on his face and head made from even more spheres and cylinders, all "pasted" together. The program didn't really provide you with any soft, organic curvy shapes. The curved head of his brown hammer head companion was made by introducing a cylinder or squashed sphere, duplicating it onto an imaginary invisible circular diameter, then duplicating those two elements, rotating them so now the four elements are 90 degrees across from each other, duplicating those into eight pieces, rotate, duplicate, rotate, repeat, repeat, repeat until you have about 100 squashed rounded bits side by side and so close AND even overlapping each other to create a softer torque shaped object. The program didn't have torques. I would then cut off one side of the torque and the half-torque made the hammer-headed curved portion of the head. NIGHTMARE!

Monday, February 6, 2012

A tale of two Excelsiors (excluding the Enterprise "B")


Here is the 6' long first model built by ILM for 1984's Trek III. I HATE THOSE MEN IN THE PIC FOR BEING THERE (just kidding)! Behind the simple domed bridge structure in the middle of the saucer, is a singular and centered "Impulse Deflection Crystal". The bridge dome, the deflector crystal, and another dome-like structure behind the warp pylon connector are 3 of the more noticeable changes on the 2nd model.


The ILM model's coloring is also less severe, with a soft soldier blue decoration.


The second and smaller 2' model for Trek VI. I HATE HER (just joking)!


The newer bridge is smaller and more complex. There are two smaller deflector crystals replacing the one larger one. The plating, now blue AND yellow, surrounding the bridge area is more pronounced. The blue markings around the ship are a richer turquoise color in the newer model. While hard to see in these pics, that dome behind the warp pylon connector has been replaced with a curvy but more squared structure.


All of these pics come from another way cooler blog, BRUCE'S DOMAIN. If you like Star Trek and Starship model building, I recommend his blog. It's very thorough.

My friends: The Great Experiment (kind of)


So I acquired from a seller on eBay, AMT's 1/1000 scale U.S.S. Excelsior at a really good knock 'em dead price. Stalking eBay is definitely worth one's time. But anyway, I had never even seen one of these models in person so I was really excited to finally get one. But I was surprised to see it's not the NX-2000 from 1984's The Search for Spock as I expected.


Instead it's the NCC-2000 from 1991's The Undiscovered Country. After seeing the decal sheet with the "NCC" call letters on it I then had to examine the small details on the model and realized it's molded after the 2nd studio model!


Which is fine by me, I just don't know why it wasn't based on the first and significantly larger model. 6ft vs 2ft, quite a difference! This has led me to wonder if the first model was damaged in storage. I know Probert's TMP Enterprise had some damages done it to while in dry-dock, err, I mean "storage", which is just one reason it had about two or 3 repaints done to it.


I'll explain and document some of the different details in the next post above with some pics of the studio models! Model-wise, the parts seem straight and crisp and seem to fit together quite well. There's some simple grid detailing on the secondary hull and underside of the nacelles I'm not thrilled about and I'm sure isn't accurate but can easily be taken care of.


The saucer section has teeny tiny portholes molded on its edge! It's going to be a great while before I can make this one tho, I've still got 5 more starship models to finish first!

Sunday, February 5, 2012

Over and Undership

As I mentioned earlier, the models are still under construction. I may have to putty some areas and repaint others. Most obvious is the missing white dome that needs to be attached over the Enterprise's hangar bay. I MIGHT spray the insides of the Enterprise's bussard scoops clear orange. The models still need gloss-prep for decal placement. But the solution needs to be ordered. A local store has Testor's decal solvent, which I'm tempted to get, tho I've never used it before. From my experience Micro Set and Solvaset are really good for this sort of thing.


I wanted to show some of the weathering I applied on these, mostly in the form of dirt or maybe chemical streaks. While that effect can be seen on the original Enterprise to some degree or another, the Klingon vessel's weathering was usually more of a subtle tonal staining. But I like my Klingon ships really dirty, even the classic design. The streaking around her photorp tube is a bit exaggerated and resembles the K'Tinga'a design elements around her launcher, but that doesn't bother me. I may wind up repainting her entire underside anyhow and I'll get into my color choice for the D-7 later.


Friday, February 3, 2012

Aft Torpedoes Armed!


Here are some views of the undersides of my Polar Lights models. Again, still decal-less for the time being. I'm definitely not the best photographer in the world and I have to say that the harshness of the camera has captured many flaws that I couldn't see with my naked eyes. but that helps to make them better, even if it does mean more puttying, sanding and repainting.


It's also hard to capture the colors correctly. The Enterprise in the middle is actually a greener blue-gray, Tamiya's Dark Ghost Grey to be exact. And the blue tones on the Klingon vessel are more aqua. I'll explain more about my color scheme for the D-7 later on.

Thursday, February 2, 2012

Fast Forward to 1967

Here is an overhead of the 3 Star Trek models I have that are closest to completion. From left to right: 1)USS Enterprise, 2nd Pilot version, 2)Enterprise, production version and 3)Klingon D-7. The three are mostly painted and have a few small parts that need attaching. They are still not adorned with decals, as I'm awaiting the decal solvent solution that has to be ordered.


Personally, I think I nailed the colors on these babies. That said, NAILED them from an "interpretive" stand point. If I am making models, especially at this small scale, WITHOUT any electrical lighting installed, I will usually color them in a way that gives them an on-screen appearance. But even then, I'm attempting to color them in such a way that only appears to REMIND you of what you saw on the tv or wherever. The 1st ship on the left was originally painted almost white. The final production Enterprise (center) was a much paler gray that was actually more greenish. Those are the correct colors without question. But the Enterprise sometimes appears somewhat bluish in scenes. So I have painted them all a darker shade to emphasize their on-screen looks under certain lighting conditions. Even then, I might augment a color.

Three Sisters (well, almost)

Hello folks! Nearly two decades later, I'm making plastic models again. And that's thanks to the evil of Polar Lights and their 3 foot long Starship (TMP) Enterprise model with clear parts for lighting. Not pictured here, and still in its beginning stages, its parts have been separated, sanded and primed and are sitting in a box, for the time being.


In the meantime, since I'm rusty after all those 18-19? years, I'm handling these smaller and simpler 10inch long ships from the original series at 1/1000 scale. With basic colors worked out, they are awaiting a gloss coat and decals. But the decal adhesive solution has to be ordered because there are few hobby shops in Miami nowadays and they are quite limited in terms of selection and supply, appealing more to the radio-control race car enthusiasts.