Wednesday, August 27, 2014

Bandai 1/700 宇宙戦艦ヤマト Space Battleship Yamato aka Argo and Intrepido. A vintage model from 1978!


I would like to share a model I made back in the winter of 2010. The Space Battleship Yamato, called Argo and Intrepido in some countries, is one of my favorite spaceships ever. It is the main vehicle seen in 1974's 宇宙戦艦ヤマト (Space Battleship Yamato), called "Star Blazers" when it was released in English, later in 1979. Other language versions were "Astronave Intrepido" in Spanish-speaking countries, and "Patrulha Estelar" in Brazil and Portugal.


The news of the live-action film with Takuya Kimura and Meisa Kuroki, along with the trailers for the film, sparked some nostalgic force in me. So in 2010, I purchased the model and a few "mini-kits" (called Mecha Colle in Japan) from the original anime series. This model is in 1/700 scale. The miniature Mecha Colle kits are non-scale. I'll post some of those later. 


This particular casting was re-released in 2009. But the original molding was done as a "Mechanical Model" version back in 1978! It's basically the same model without the interior parts like the engine and the Wave-Motion gun. 


When I made the kit in 2010, it was my first model in nearly 7 years. So I was extremely excited to get my hands on this project.


I want to mention again that I'm not a professional model-builder so many of my remedies to details and such are experimental.


My first concern was the color. I blended a medium-to-light gray with a touch of blue and a few drops of purple. In some episodes it has this color. At other times, the color is more blue-green-gray. As the series progressed through the 1980's with sequels and seasons two and three, the ship's gray livery gets darker and darker. 


Windows, portholes, and other lights change from greens to yellows, even soft blues, throughout the many incarnations of Yamato. I chose the green lights. I wanted my Yamato a lighter color because this is the way it appears in the very beginning of the show as it rips out of the ground. My pictures make it look darker than the actual thing.


When I got the model, I was slightly disappointed by the lack of detail in some areas. Because Yamato is such a classic, there are many model kit releases available. The newer ones kept improving on the surface detailing, so I had to add some of my own. These subtle additions were mostly panels and hatches that I painted on the surface to bring my model up-to-date. 


I experimented with brushes and tried making some weathering on the hull. But I didn't want it to look too battle damaged.


I did some old fashioned "lighting" tricks, like using very light colors for glowing areas.


For a model from 1978, the halves of the fuselage fit together very nicely. I did have to do quite a bit of sanding but very little puttying was needed. 


I definitely want to get the 2199 version. Bandai makes it in 1/1000 and 1/500. But for right now, I really like my simple old-fashioned model kit.


There's something very expressive and very alive about these older kits. They really do capture the spirit of these classic animes from the 70's and 80's. And along with Kodai, Mori, Sanada and all the rest, the Yamato itself feels like one of the main characters as well.


Monday, August 25, 2014

BANDAI 1/1000 GAMIRASU WARSHIPS SET 2 (ガミラス艦セット2) PART 3

Kripitera Class Destroyer (クリピテラ級航宙駆逐艦)


An animation cell showing a fleet of Clipitera accompanying Emperor Desler's blue command Ship. Emperor Desler was renamed Desslok in the American dubbing by Voyager back in 1979. Image is courtesy of Cosmo DNA. As I mentioned earlier, Cosmo DNA is an excellent site for English-speaking fans.


In this screen capture from Yamato 2199, you can see two Kripiteras side by side on the Floating Continent in episode 3. Bandai's Garmillas Set 2 includes 2 of these sleek destroyers. It makes perfect sense. These are the most common warcraft used by the Gamiras. And they are often seen traveling in close proximity, evoking the sense of ambush predators hunting in a pack.


They are among my favorite of the Yamato 2199 designs, which is the reason I got this kit first.


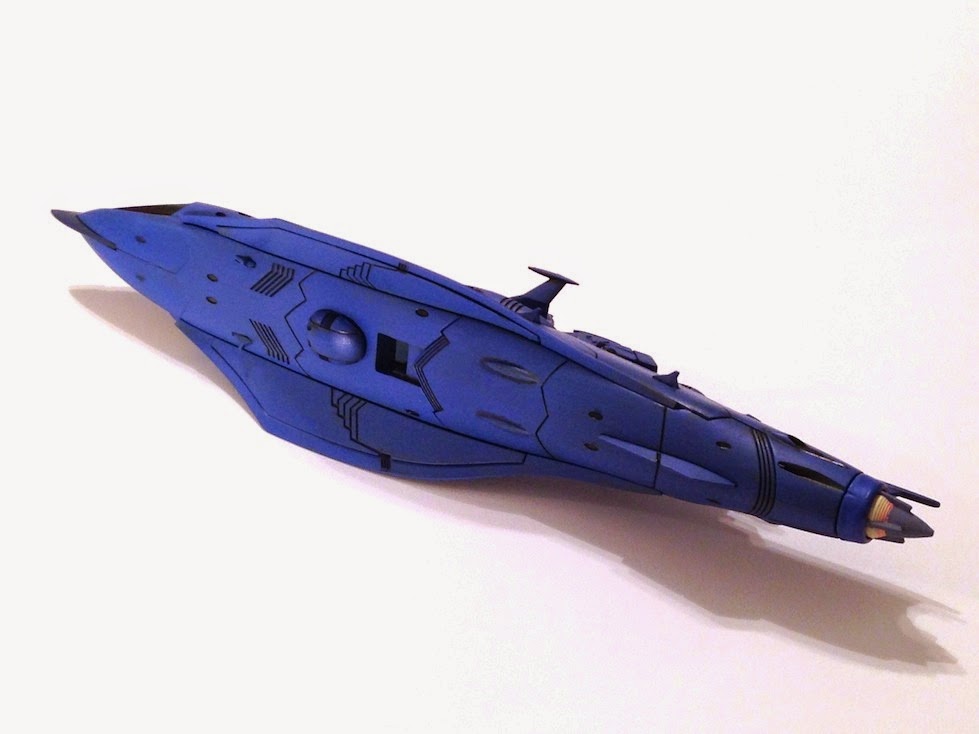
Although I wanted to make two identical green destroyers, I finally decided and made one in the Royal Guard blue. My camera is very sensitive to blue and this is not the actual color of the finished model. The actual finish is a lot more toned-down. A LOT.


The engine exhaust on the green Gamiras/Gamilon ships in the anime appear fuschia or magenta. The "eyes' glow a soft lime and then change to bright yellow and orange when the ships are charging for battle. The blue ships of the Elite Guard have slightly different light effects. The "eyes" and engines glow a bright yellow-white that changes to hot pink in areas.


That's still not the actual blue. Why does my camera do that?!?!?


Bandai created a standard display system that allows most of the models from the same series to be interchanged on the different stands so you can mix and match your favorite ships. For this reason I haven't added the decals yet. The labels for the models look very cool in Katakana and Kanji. But I might switch the combinations of spacecraft from other sets. So I'll wait a bit before adding names to them.


The design of this is sleek and squid-like. I feel like the creators of these machines were seeing submarines in space, as well as surface vessels. 


This picture above captures the color of the blue a little bit better. I forgot to clean the models before photographing! Excuse my dust!


Here are the destroyers next to Colonel Schultz's larger Gaiderol battleship. I love these things!


A photo showing them next to some familiar objects for size reference. 


BANDAI 1/1000 GARMILLAS WARSHIPS SET 2 (ガミラス艦セット2) PART 2

Gaiderohl Class Battleship (ガイデロール級)


The Gaiderol (alternative spelling), first appeared in episode 9 of the original Space Battleship Yamato of 1974. It was commanded by Colonel Walke Schultz. You can see a Clipitera class destroyer right under it in this image, courtesy of Cosmo DNA, an excellent site for english-speaking fans.


The Yamato 2199 version is very true to the original design. The colors have been simplified and there's a lot more surface detail.


This is one of my favorite ships from the whole series. In my opinion, Yamato has some of the most original designs in anime as well as science fiction.


The look of Yamato is inspired by WWII military vehicles. The Yamato herself is the rebuilt battleship from WWII. There are fighters and bombers that engage in aerial dogfights in space. Battleships like this one have rotating turrets and fight battles side by side, just as they did in the 1940's.


The designs of the Great Gamiras (Gamilon) Empire incorporate a mixture of WWII sensibilities with organic shapes that are reminiscent of sea creatures. Gaiderol looks a bit like a giant catfish or lamprey. These designs were ahead of their time for 1974. That's 3 years before Star Wars!


I left the underside below the waterline mostly unpainted and simply panel-lined. I primed the inside of the engine in white and painted it a bright magenta, imitating the color of the exhaust in the anime. I've seen some more advanced modelers illuminate the model with LED's, which looks amazing. But I'm satisfied with the way mine turned out using old-fashioned hand-painted lighting tricks.

BANDAI 1/1000 GARMILLAS WARSHIPS SET 2 (ガミラス艦セット2) PART 1

Part One: Overview, Construction and Painting

It's been nearly a year since this wonderful model was released by Bandai. I acquired mine back in March for my birthday. It is an absolute must for fans of 宇宙戦艦ヤマト2199 (Uchū Senkan Yamato 2199). 

Yamato 2199 (2012-2013) is a remake of the original Space Battleship Yamato series from 1974. The original series was released as an english dub in the U.S. as Star Blazers back in 1979. I have to admit, Star Blazers has a strong nostalgic power over me. I would watch it as a child, every morning at 7:00 a.m., right before school. At age nine, Star Wars, Battlestar Galactica, and Star Blazers were all on an equal level. And they still are in my mind. 
When I was a child, we called the alien enemy that commanded these ships the Gamilons. Their original name in Japan is Gamirasu (the "u" is silent), sometimes written as Gamilas or more recently, Garmillas. I like Gamiras(u). It sounds more menacing. 
If you are a fan of anime, the new version is truly AMAZING. You can see a trailer for the english-subtitled release here. And here is a more explicit trailer for DVD volume 6 in the original Japanese. 


The kit consists of four models in one box. Included is the larger Gaiderohl Class Battleship (ガイデロール級), two Clipitera Destroyers (クリピテラ級航宙駆逐艦). All three of these are in 1/1000 scale. Also included is a bonus Salvar S-VI Heavy Tank in non-scale (probably 1/160 or 1/200).


I'm not a professional modeler. My skills include puttying, sanding, priming and basic painting. I have been building plastic models since the 1980's but it's not something I do all the time. If you're an average builder like me, you can still make a really good model from this kit with very little effort. 

I have to say that Bandai has raised the quality of their kits to near perfection. There is practically no flash. The parts fit with no mis-matched left-right warping whatsoever. There is only one area that really needs any puttying. It's a hair-thin gap near the front of the upper hull of the Gaiderohl Battleship. Apart from that, most everything else is a breeze for an impatient person like myself. 

The one annoying part is the tiny fins that cover all three of the spaceships. You can see one of them on my finger in the picture below. 


I don't have large hands! The fins are tiny!


My solution to this challenge was the method I used below, using tweezers and flipping the glue applicator. Otherwise, there would be glue leaks everywhere! I'm sure this method has been done a thousand times but I felt like sharing. IMPORTANT: The instructions indicate that these fins should be placed LAST. They are 100% correct. I made the mistake of applying some of them to the sub-assemblies, and had them fall off all the time when I started connecting the larger parts later. You can get as inventive as you like with the painting of this kit, but please follow the instructions carefully! As usual with Bandai, they are in Japanese but extremely easy to understand.


Another trick I found is an amazing product made by Tamiya, the Panel Line Accent Color. It is available in black, brown, or grey. This is a joy for lazy people like myself who don't like doing classic panel line wipes and inhaling massive amounts of paint thinner! 


As you can see in the above pics, it helps to accentuate the lines on the model. It works best with glossy paint or semi-gloss. It's not good with flat paint, where it drips where ever it wants to. Luckily, the Tamiya flat military spray paints I used are actually a bit semi-gloss. I have seen pictures where people made these same kits without painting the models and just used the panel line formula and they look fantastic! NOTE: excess panel line stains are removed using an enamel thinner like Tamiya's X-20. The thinner does not harm Tamiya spray paints as they are lacquer based. You can see a demonstration of this method here. Some people even use this method to make weathering streaks. The different colors can be mixed to make a dark gray, gray-brown, etc...


Above is a masking trick I used when painting the tiny curved bridge windows. Putting tape on one side allowed me to brush the paint on without being too precise. I primed the small spaces white first for maximum contrast from the yellow colors.


I then very lightly sanded the surface, removing the excess yellow.


I decided to paint one of the Cripitera Destroyers in the blue color used by the Gamiras Royal Guard. With coloring, I tend to be more of a perfectionist. So I mixed my own color. It's a semi-gloss mixture of navy, light gray, and a blue-violet. My camera doesn't capture this color well at all. The pictures make it look much more intense than it appears in real life. I applied this color with a brush. Obviously, an airbrush would have made the finish even smoother, but this worked out very nicely. I think it's because blue and gray acrylics tend to spread better than other colors.